4 posts tagged with "project"

View All Tags

Trek's File Storage System with Amazon S3

· 4 min read
Jacob Zhu
Developer
Matthew Kang
Developer
note

This blogpost is a modified version of an internal Trek document. You can view the internal document here.

At Trek, our goal is to make trip planning as smooth and efficient as possible. To achieve this, we decided to integrate AWS S3 for storing images and files, allowing users to upload photos and other media easily. In this blog post, we’ll walk you through our integration process, the challenges we faced, and how we overcame them.

Why AWS S3?

AWS S3 (Simple Storage Service) provides scalable object storage, making it an ideal choice for our needs. It offers:

  • Reliable and durable storage.
  • Scalability to handle large amounts of data.
  • Integration with other AWS services.
  • Secure access control and management.
  • Overview of the Integration

The integration of AWS S3 in Trek is handled entirely by our backend Express server to ensure security and simplicity. Here’s a high-level overview of the data flow when a user uploads an image:

  • User Uploads Image: The user uploads an image through the frontend.
  • Backend Processing: The image is sent to the backend server, which handles the upload to S3.
  • S3 Storage: The image is stored in an S3 bucket.
  • MongoDB Logging: Metadata about the uploaded image is logged in our MongoDB database.
  • S3 Pricing Considerations

While AWS offers a Free Tier with the following limits:

  • 5GB of S3 storage.
  • 20,000 GET requests.
  • 2,000 PUT, COPY, POST, or LIST requests.
  • 100GB of data transfer out per month.

It’s essential to monitor usage to avoid unexpected costs. We learned the hard way when a private, empty S3 bucket unexpectedly incurred a $1300 charge. Always monitor your S3 usage and set budget alerts to avoid surprises.

Setting Up AWS Access

To interact with AWS S3, we use an IAM user, trek-s3-user, which has the necessary permissions to upload files. The credentials are stored in environment variables for security:

ATLAS_URI="..."
AWS_ACCESS_KEY_ID=your_access_key_id
AWS_SECRET_ACCESS_KEY=your_secret_access_key
AWS_REGION=us-east-2
S3_BUCKET_NAME=cpsc-455-trek

These keys are used by our backend server to authenticate requests to AWS S3.

MongoDB Schema for S3 Files

We keep track of the files stored in S3 using a MongoDB collection called S3Files. Here’s the schema:

  • _id: Auto-generated unique ID.
  • key: S3 object key.
  • bucket: S3 bucket name.
  • url: URL of the stored object.
  • upload_by: User ID of the uploader.
  • upload_time: Timestamp of the upload.

Backend Validation Before Upload

To ensure that only appropriate files are uploaded, we perform several validations on the backend:

  • File Type: Verify the file type being uploaded.
  • File Size: Check if the file size is within acceptable limits.
  • Upload Frequency: Limit the number of files a user can upload within a specific period.

Middleware for S3 & MongoDB

Our backend uses Express middlewares to handle the upload and logging process:

  • Auth0 Middleware: Verifies the JWT token and appends user information to the request.
  • S3 Middleware: Uploads the image to S3 and appends the metadata to the request.

Here’s an example of the S3 uploading middleware:

import { upload } from './s3/upload';

app.post('/test/upload', upload.array('photos', 3), function (err, req, res) {
if (err) {
// handle upload error
}
res.send('Successfully uploaded ' + (req.files?.length ?? 0) + ' files!');
});

If an error occurs during the upload, it’s passed to the callback function, allowing for proper error handling.

Conclusion

Integrating AWS S3 into Trek has enhanced our ability to handle user-uploaded images efficiently and securely. By leveraging AWS S3’s scalable storage and integrating it with our backend, we’ve ensured that our users have a seamless experience when planning their trips. We hope our journey and insights help you in your own integration projects.

Stay tuned for more updates and technical deep dives from the Trekkers team!

Choosing the Best Geographic Information System (GIS) for Trek

· 5 min read
Matthew Kang
Developer
note

This blogpost is a modified version of an internal Trek document. You can view the internal document here.

Integrating Google Maps was our original plan at Trek until we realized that the cost of integrating Google Maps would be outside our budget, as well as the budget of anyone deploying Trek.

Although Google provides its customers with a $200 credit for the use of their APIs, including the Google Maps Platform APIs, once customers exceed the $200 limit, they are faced with potentially thousands of dollars in billing statements.

The truth is, Google holds a monopoly over high-quality geographical information, especially their Places API, which provides the best up-to-date Points of Interest (POI) data. Using Google would be the best move if we could afford to lose the money. Unfortunately, we are not one of those companies that can lose money for a decade before making a profit.

Furthermore, Google does not allow its customers to cache or store any of its data (with the exception of place IDs), which means that every time we want to display a place name for the user, we have to call Google's API—something we cannot afford.

This blog post goes through the GIS alternatives to Google Maps that we have explored in the process of designing and building Trek.

What is a GIS?

A Geographic Information System (GIS) is a powerful tool that allows users to visualize, analyze, and interpret spatial and geographic data. In the context of Trek, a GIS is essential for enhancing the user experience by providing detailed and interactive maps, route planning, and information on places of interest. It integrates various data sources to create a comprehensive view of the trip and the world.

A Geographic Information System (GIS) for Trek should offer the following features or services:

Maps - Various visual dynamic maps imagery. Displays maps for ‘Map View’ and location markers, ‘Pins’ within the map, and geographic information (longitude and latitude) to provide context when searching for places.

Routes - Provides routing information in ‘driving’, ‘transiting’, ‘cycling’, or ‘walking’. Find best routes from place to place in different transportation methods.

Places of Interest (POI) - Provides information on places and ability to search for places. Gathers and provides place information including place ID (identifiers), name, location, description, address, photo, and reviews.

What makes a GIS Good (for Trek)?

GIS can be used in many different applications and use cases. The goal of GIS in Trek is to help meet its functional and non-functional requirements, including scalability and future-oriented design. The goal is to explore different GIS options Trek can integrate, while considering the following:

Compliance — “Are we complying with GIS’ Terms of Service? Are we stealing data and potentially committing academic misconduct?”

UI/UX — “Does the UI Look Good?”

Usability — “Does it provide good usability with sufficient information of places and provide quality search and personalization?”

Sustainability — “Will the system be financially sustainable with the integration costs? Can costs be lowered by caching or storing data?”

Maintainability — “Is the information easily manageable and does not require frequent extensive maintenance on Trek’s end?”

Dependency — “Can we manage our own information without relying on the GIS? Are we able to migrate from this GIS to another system easily”

Comparison of GIS API Integrations

Some GIS services do not provide all three packages (Maps, Routing, POI). Some GIS services do not allow caching or storage of data. Some GIS services are outside our budget.

Summary

APIMaps & RoutingPlaces of InterestsCaching & StoringPricingDescription
Google Maps PlatformBestPhotos, ReviewsRestrictiveHighBest up-to-date POI information
FourSquareN/A (POI only)Photos, ReviewsRestrictiveMediumProvides decent POI and places ‘personalization’; best for tourist POI
MapboxGoodIntegrates FourSquareRestrictive (non-enterprise)Medium/LowAlternative to Google Maps. Good UI. OSM-based. Second most popular
LocationIQNo transit routingOnly GeoCodingAllowedLowFully OSM Data packaged as API. Comes with only Geocoding data (no POI)
MapTilerGoodBasicClient-sideLow
HEREGoodBasic30 days or Response HeaderLowNo permanent storage of location IDs
MapQuestNo transit routingBasicRestrictive (non-paid)Low

POI Data: Image, Description, and Reviews Data

Apart from Google Maps Platform and ForeSquare, OSM-based GIS APIs only provide basic POI data. Some GIS APIs do not provide contact information or opening hours. We can integrate the following technologies to provide end-users with these data:

  • Image – For landmarks, well-known businesses (e.g. McDonalds), and attractions, use Wikipedia API to fetch images that are shareable for commercial purposes.
  • Description – For landmarks, well-known businesses (e.g. McDonalds), and attractions, use AI generated descriptions.
  • Contact, Hours, and Reviews – Use TripAdvisor or Yelp API to link review data, open hours, and contact information. Only load review data if the user clicks on it to limit unnecessary API calls. Yelp allows caching up to 24 hours but has no free tier.
  • In-House User-Contributed POI Data System – Support an in-house user-contributed POI Data system, where users can upload images, description, and reviews to a place.

Local Deployment and a Glimpse Into Trek's CI/CD System

· 7 min read
William Xiao
Developer

One of our goals as the Trekkers was always to be able to have a cost-effective but performant deployment of Trek. As someone who self-hosts their own server for their personal site, I thought it would be quite suiting to see if our current needs for deployment and CI/CD could be met through repurposing part of self-hosted solution.

My Site

As a little bit of background, my personal site (https://wyfx.ca) was originally started as just a way for me to take the Raspberry Pi I had sitting at home and make it something useful.

The site was developed under Vite, and deployed under a Docker container running nginx. Whenever I have a new version of the site, I build a new version of the Docker container, then manually restart the container.

At Trek, one of our priorities is always knowing about the status of our product. Hence, with some of my knowledge on the team, we aimed to leverage that knowledge to develop our own self-hosted solution for development purposes.

Considerations

On the implementation side, moving from a simple statically hosted website to an integrated solution with our GitHub workflow would not be easy. Our goals for Trek's deployment solution would be something that is integrated with GitHub, performant enough to run on my Raspberry Pi, and automatic. This solution would be key for our CI/CD process and would ensure that we'd able to quickly iterate on new updates to our codebase.

Security

Security was especially important to me as we needed a solution that would not expose my self-hosted server to too much risk, but would still be able to automatically integrate with GitHub. My home server did not have a publicly exposed SSH port, yet without one we would not be able to upload files to the server. However, as my main account on the server was an administrator, I did not want any possible SSH solutions to have full access to the administrator account.

Performance

The second primary consideration with our design was performance. This includes both the "visible" parts of the site (like API and frontend), but also the build process from a successful push to GitHub. While we would not have to worry about a large amount of users on the development site, we still wanted a solution that would be performant enough for us to evaluate how the site would behave for production deployment in the future. The limited compute power of the Raspberry Pi also means that this deployment needs to be as lean as possible.

Maintainability

The last key consideration was maintainability. The development of Trek moves quickly, so our system should be able to adapt to those changes quickly. Without a maintainable system, the system could quickly become obsolete - sacrificing valuable developer time.


With all of our considerations in mind, we started the design of the CI/CD system.

Deployment

Since I was most familiar with a Docker container setup like my home server, my initial thoughts were to create another container running on the server at the same time as my personal site. So the first challenge was coming up with a deployment that would allow both Docker containers to run at the same time while redirecting to different domains. My solution to this issue was to use nginx-proxy. nginx-proxy essentially acts as a reverse proxy that routes to Docker containers by subdomain. Now, I can start my own website's container with an environment variable VIRTUAL_HOST=wyfx.ca, while having Trek on a subdomain like SUBDOMAIN.wyfx.ca. To handle HTTPS, I extended my original LetsEncrypt certificates using acme-companion, which will automatically generate a new HTTPS certificate for each of my subdomains by specifying LETSENCRYPT_HOST=SUBDOMAIN.wyfx.ca.

The largest decision to make was how to get updates from our GitHub repository. As I didn't want to expose a public SSH port on my home server, I initially thought about a solution that wouldn't directly connect the GitHub repository to the server. Instead, the server could poll for changes on GitHub, and when changes are detected, the following would occur:

  1. Pull the changes from GitHub
  2. Build a new container
  3. Restart the running container

However, we did not end up going with this idea for a few reasons:

  • Unless we polled at a very fast rate, there was still going to be a delay before we could even detect a change from GitHub
  • There were concerns with performance from the fact that the Raspberry Pi would have to do all the building
  • We would have to create our own scripts to make the polling + building possible, which would each cost us maintenance time

The solution we ended up using for the frontend was to create a nginx Docker container that is also running a SSH server. Then, to update the frontend, we could write a GitHub Action to build the frontend, then SSH into the Docker container and replace the static files in the container. This solution was much simpler, which would make it easier to maintain. It also does not involve constantly rebuilding the Docker container, as we would be making local updates to its filesystem instead. In addition, having the publicly exposed SSH port be into a container would gave me some more comfort that any attacks would not be able to immediately access my entire server (though such attacks are possible).

The frontend workflow

Our GitHub action to build and upload the frontend is included in the Appendix. It builds our frontend using npm, and then uploads it via SCP to the Docker container using appleboy/scp-action. This ended up looking like the following:

name: Deploy Frontend Dev
on:
push:
branches:
- "project_[0-9]-dev"
jobs:
deploy:
name: Deploy FE Dev
runs-on: ubuntu-latest
concurrency: deploy-group # optional: ensure only one action runs at a time

steps:
- name: Checkout
uses: actions/checkout@v4

- name: Build FE
run: |
cd frontend
npm install
npm run build

- name: Upload to server
uses: appleboy/scp-action@v0.1.7
with:
host: REDACTED
username: REDACTED
password: REDACTED
port: REDACTED
source: "frontend/dist/*"
target: REDACTED
overwrite: true
strip_components: 2

For the backend deployment, we built off of the frontend deployment. Our backend deployment uses tsc-watch to start up our backend server, and then monitor for file changes. Then, a GitHub action is triggered whenever a push has been made to our dev branches, uploading the files via SCP. tsc-watch is built to automatically detect those changes and rebuild the backend dynamically as its files change. To support the communication between our frontend and backend, the backend runs under the same nginx server as the frontend. Requests to our API endpoints (e.g. /api/v1/users) would then be forwarded to the backend server, allowing us to remain under the same subdomain and avoid spawning too many Docker containers for the server to handle. To make this happen, our nginx.conf includes the following:

server {
location /socket.io {
proxy_set_header Host $host;
proxy_set_header X-Real-IP $remote_addr;
proxy_pass REDACTED;
}
location / {
root REDACTED;
index index.html;
try_files $uri $uri/ /index.html;
}
location /api {
proxy_set_header Host $host;
proxy_set_header X-Real-IP $remote_addr;
proxy_pass REDACTED;
}
error_page 500 502 503 504 /50x.html;
location = /50x.html {
root /usr/share/nginx/html;
}
}

By overwriting what happens with the location /api line configuration, we are able to redirect requests to go to the backend server rather than still going to the frontend.

The Future

As Trek continues to develop, our CI/CD system will have to evolve too. One of our upcoming goals for a future sprint is to integrate testing frameworks into both our frontend and backend. When our backend develops more, we might also find that the self-hosted server won't be powerful enough. However, with our maintainable and reproducible system, we are well-equipped to handle these future challenges with ease.

A Deep Dive into Trekkers Project Workflow

· 6 min read
Matthew Kang
Developer

Our primary organizational goal at Trekkers is to develop software using the best industry practices we learn from workshops, lab assignments, and our project experiences. When building Trek, we aimed to adopt Agile values and principles effectively in our project workflow.

The CPSC 455 course, titled "Applied Industry Practices," emphasizes industry practices. However, being Agile is not about merely adopting the most popular industry practices but about embracing practices that support our principles and values. Simply following the most popular "Agile" practices doesn't make us an Agile development team. We strive to be more than just another shop that claims to be Agile.

Manifesto for Agile Software Development:

  • Individuals and interactions over processes and tools
  • Working software over comprehensive documentation
  • Customer collaboration over contract negotiation
  • Responding to change over following a plan

In our development journey, we have chosen to follow Agile principles because they align with our commitment to continuous improvement, collaboration, and delivering value to our users. Our adaptation of Scrum reflects our dedication to these principles, the Trekkers Code, and our desire to create an effective and efficient workflow that supports our project goals.

Our Version of Scrum

Our version of Scrum aims to be as Agile as possible while meeting all project requirements and learning objectives.

Weekly Sprint Schedule

Individual (non-Trekkers) Course Assignments and Deadlines are italicized

DaySchedule
SundayStart of Sprint Meeting @ 10:00 AM
Bi-weekly Formal Scrum due @ 10:00 pm
MondayBi-Weekly Individual Assignments Due @ 10:00 PM
Tuesday
Wednesday
ThursdayMid-Sprint Check-in Meeting @ 5:00 PM
Planning for next sprint or WIP Progress presentation.
FridayBi-Weekly Individual Workshop Survey Due on 11:59 PM
SaturdayEnd of Sprint (Push @ 10:00 AM)
Sprint Review: Read other members' scrum reports.
  • Our sprint begins on Sunday @ 10:00 AM and ends on Saturday @ 10:00 AM.
  • During the Start of Sprint Meeting we review our scrum report (Sprint Review) on what we have accomplished in the past sprint, and formalize new sprint goals.
  • During the Mid-Sprint Check-in Meeting (happens during Labs), we do a brief check-in on the progress of our sprints.
    • Based on our progress, we do some planning for what we should do on the next sprint
    • On weeks where there are Workshop Presentations, we do planning for presentations, writing documentations, etc.
  • Every Saturday @ 10:00 AM is the End of Sprint. Everything should be pushed by then.
    • By noon, every completed issues that have not been closed yet should be closed.
    • By noon, everyone should complete a very brief scrum report. We use these weekly internal scrum reports for bi-weekly external (submittable) scrum reports.

Meeting Agenda Template

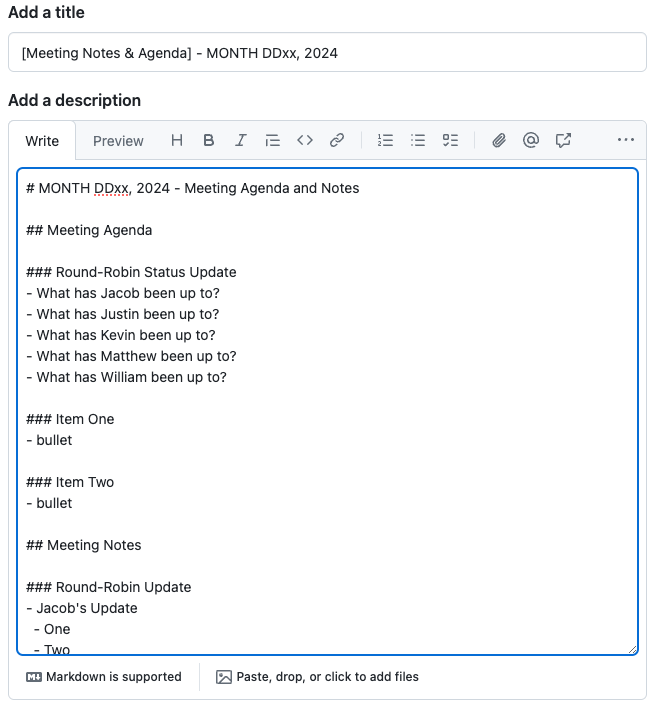
Our Scrum meetings are structured on agile principles of communication, interaction, and collaboration. We have structured a meeting agenda flexible template that lets us stay focused on reviewing sprints and internal demos, while letting us plan for our next sprint.

Our meeting agenda template exists as a GitHub issues template (screenshots below).

Issue Template Issue Template 2

GitHub Issues for Project Management

We decided not to use GitHub Projects because we couldn't adjust the visibility settings of the project board. We wanted to create a collaborative environment where team members could actively update their progress without it being publicly visible to other classmates.

Instead, we are using GitHub Issues as our main platform for project management. Our belief is that with effective scrum meetings, the utilization of GitHub Issues can facilitate clear communication and tracking of tasks and promote Agility. Here's how we leverage GitHub Issues in our workflow:

Creating Issues

Mostly after each scrum meeting, every task, bug, or feature is logged as an issue. This ensures that all work items are tracked and nothing is missed. Issues are tagged with appropriate labels (e.g., frontend, backend, bug, documentation) to categorize and prioritize them effectively.

Assigning Issues

During the scrum meetings, each issue is assigned to a specific team member based on their expertise and current workload. We use GitHub's assignee feature to make sure responsibilities are clear.

Tracking Progress:

Issues are updated regularly with comments and status updates. We use Discord as our primary platform for communication, including discussions of issues. Our Discord consists of channels for each type of work (frontend, backend, documentation, etc). We associate branches with issues using GitHub's branch linking feature, which makes peer-review easier.

Sprint Planning and Closing Issues

At the start of each sprint, we create, review, and prioritize issues. High-priority tasks are marked with the "PRIORITY" tag. During the End of Sprint, we review all closed issues. We use the scrum meeting agenda (as an issue), where we link the closed issues for discussions.

Continuous Integration and Deployment

To ensure the quality and stability of our software, we have set up continuous integration and deployment (CI/CD) pipelines:

Automated Testing

Every push to the repository's "progress" branch triggers automated tests. This helps us catch issues early in the development cycle. We aim to maintain a high code coverage to ensure the robustness of our application.

Code Reviews

All code changes are submitted through pull requests (PRs). PRs must pass automated tests and be reviewed by at least one other team member before being merged. This practice helps us maintain code quality and fosters knowledge sharing within the team.

Continuous Deployment

Once a PR is approved and merged, our CI/CD pipeline automatically deploys the latest code to our private staging environment. We perform final checks in the staging environment before promoting changes to the released demo environment along with release notes published on our website.

Our Workflow is Evolving

By adhering to Agile principles and customizing our workflow to fit our team's needs, we strive to deliver high-quality software efficiently. Our structured yet flexible approach to Scrum, combined with the effective use of GitHub Issues and CI/CD pipelines, enables us to stay organized, collaborative, and adaptive. We continuously seek to improve our processes and deliver value through iterative development and frequent feedback during scrum meetings and workshop design reviews.

Our workflow is constantly evolving as we learn and adapt. We are committed to refining our practices, incorporating new insights, and staying responsive to the changing needs of our project and team. This continuous evolution helps us stay agile and ensures that we can meet our goals effectively.

We hope that our detailed project workflow provides insight into how we manage our development process and can serve as our own reference for our future development journeys.